My attempt at getting a PC or Mac into my 2003 WRX wagon.

Friday, July 08, 2005

Valentine V1 installation, continued

After having dissected the wiring diagram for the interface needed to read the signals from the V1 I decided to just buy a prebuilt cable instead. It may or may not work with the software mentioned in my previous post but, according to the folks who sell the cable, does work with Software One.

XM Radio, part 2

After an initial unsuccessful attempt at getting XM Radio to work I decided to try and get this to work using the serial to usb converter instead of plugging straight onto the motherboard's COM2 port. This worked out of the box but I (of course) had to redo my connections because I'd manually mapped them onto what I thought were the right pins given my cable setup. I didn't have the right cable to hook onto the motherboard and so I decided to try and wire things myself. In the end this turned out to be a wasted effort so now I need to go and find the proper (twisted) serial cable. It's getting there ...

I also had to resend the activation code for my radio and hope to be on-line any moment now ... let's hope it doesn't take an hour as they claim is sometimes the case!

Thursday, July 07, 2005

Valentine V1 + XM Radio

The latest developments on the car PC include the installation of an XM Direct unit which I've yet to get to work and I also just ordered a little tool which will allow me to hook up my Valentine V1 radar detector to the PC. Coolness. Given the issues I currently have with the LCD's brightness I'll probably keep both interfaces for now (PC + remote display).

The XM radio doesn't work, yet. And I'm regretting the fact that they don't have any NPR stations and not having done my homework ahead of time. I built the cable last night and that didn't work so I tried connecting it via a Serial to USB device and that doesn't work either. For starters I tried using a demo version of TimeTrax software but it never gets past the step where it seeks out the device. I'll probably try a different piece of software in the interim, like Frodo player. The device hasn't been activated yet and I don't know how well TimeTrax deals with this situation. We'll see ...

Wednesday, June 15, 2005

cables ...

Well, last night I spent some quality time with my multimeter, my soldering iron, and the manual for my motherboard. At the end of the day I managed to make two USB 2.0 cables and one Firewire cable (quite a bit trickier because of the braiding, and shielding). But, it works. I also re-glued on the usb/firewire port thingy because my previous epoxy job didn't cut it so this time around I used some very slow curing stuff. Let's hope it works ...

Next up ... make a serial cable (for use with OBD II reader) and one (or two) more USB cables. Fun, fun, fun!

Tuesday, June 14, 2005

status

Well, things are starting to take shape...

The OBD II code reader and the laptop style slim DVD+/-RW device arrived on Friday. In an attempt to install these two devices I also re-routed the audio cables from the amp (which is an Alpine MRP-F240 4 channel amp), integrated two USB and a firewire port into console box, right next to the hand brake. Two USB ports eminate from here and I've yet to decide whether or not they should go to a HUB or straight to the motherboard. Considering that I've already used up two of the three existing USB ports on the m/b this decision may just make itself ... Also, I'll need to fashion my own firewire cable which definitely will be connecting straight to the motherboard. There's been some talk about having a dedicated iPod dock connector but the question is where would it go and also what would one do about having to press the little tabs on the side of the connector that cause the springs to release and dislodge the iPod once it's been plugged in (a solvable problem, just probably not for cheap).

As for the DVD reader/writer, it has an IDE interface. The longest IDE cable I can find measures 46 inches which is plenty but it's not a shielded cable and the longest Ultra ATA IDE cable I can find is 36 inches which is a bit short. SATA on the other hand ... one meter (SATA2 goes up to two meters, and you can find shielded cables too!). All too short. The other option is to use a IDE to USB converter and just use the USB hub but ... that sounds slow, and crappy. I've contemplated the idea of extending a SATA cable myself by the few extra inches I'd need but I'm afraid that the 1 meter cables may already be out of spec and hence making them any longer definitely won't help. We'll see...

Meanwhile, I've also added three RCA jacks at the back of the console box, available from the back seat. They aren't connected to anything yet but will eventually patch straight into the amp for the audio and directly to the lilliput display for the video. Now if only I could toggle the video input on the lilliput with a little more ease ...

In the meanwhile I've been having sporadic issues with sound. Sometimes it works, sometimes it doesn't. I'm starting to think that I may have too many devices plugged into my USB hub (7-port). Who knows ... unplugging the card and then replugging it seems to fix things so ... big question mark. Also, the touchscreen seems to work only about 50% of the time. Too many USB devices ... Windows can't handle 'em all!

Monday, June 13, 2005


Firewire and USB ports will next right next to the hand brake. Posted by Hello


view from opposite side showing installation of USB and firewire ports Posted by Hello


removal of even more plastic in preparation for installation of DVD drive in arm rest, re-routing of audio cables, installation of USB and Firewire ports, etc ... Posted by Hello

Thursday, June 09, 2005


a final look at the installation of the amp from the rear passenger seat. All the wires have been tucked away and routed such that things don't look too offensive. Also, the amp is now bolted down into the car. It hurt so much to drill holes in the floor you wouldn't believe ... Posted by Hello


amp rotated 90 degrees from previous picture so that it's possible to get to the controls for the amp without having to remove the seat every time :) Also note the wires now go under the carpet and the length of the ground has been significantly reduced (will now be attached to one of the bolts on the seat). Posted by Hello

I may try routing the power cable (the big fat red one) on the other side of the seat (so that it's not next to the speaker cables). But that's not for today... I'll deal with that when it's time to install the DVD drive (which will probably live in the arm rest) along with an additional USB hub and a firewire cable, because you can never have too many firewire cables, really.


Look how much room there is once you've removed the seat! Also note that the door sill has been removed. Underneath the carpet lies a whole bunch of wiring and some grommets which I used to route the wires (not shown here, yet). Posted by Hello


This isn't the usual location for the passenger seat ... but it had to go in order to prepare for the installation of the amp. Posted by Hello

Four bolts (torqued like hell, especially the two in the rear) along with a connector for the airbag are all that hold this puppy in place. Think I should have slapped in some Recaro seats while I was at it??? :)

Tuesday, June 07, 2005


close-up of installation of LCD. Note how much glare there is. Posted by Hello


A quick view of what the "final" installation looks like including the a remote display for the Valentine V1 radar detector. Posted by Hello


VIA EPIA motherboard undergoing installation of Microsoft Windows XP using a busted iPod Mini's 4GB Microdrive (which everyone claims is useless unless you've got a super old model but seems to work in this case). Posted by Hello

Latest Developments ...

Well, the first incarnation of the PC in my car actually happened on the 28th of May.

On Friday night I picked up a VIA EPIA M1000 motherboard from Fry's Electronics for 170$. On Saturday the enclosure for the LCD arrived from TMZ Engineering. I'd decided to go with the 7" Lilliput screen in lieu of the Xenarc mainly because this enclosure existed and hence would save me many hours doing putty work trying to get the LCD to fit into my center console.

So ... the two main components arrived. I had some extra memory just lying around accumulating dust, a 200 GB hard drive doing the same, and a 250W power supply doing the same. I also picked up a small inverter from Fry's on Friday in order to test my setup before taking the plunge and purchasing a dedicated power supply.

The LCD arrived on Friday and I began disassembly of the unit the following Saturday afternoon. By Sunday early morning it was all up and running in my car. The instructions on TMZ's site were useful but the newer Lilliput units are a little easier to dismantle because some of the wiring is connected via connectors instead of being soldered straight on. Also, instead of desoldering the cables used for the power adapter I instead cut through the plastic casing of the Lilliput case thus leaving all of the wires and connections intact. I did however modify the case from TMZ by removing the notch that covers the power connector and also gives access to the RCA plug. I eventually also did the auto-power-on hack by getting to the administrator's menu so that I wouldn't need to use the remote control or the buttons to turn the display on so that it powered on as soon as there was current going through the circuit.

I intially used Windows XP and had a hell of a time getting the touchscreen to work. The drivers are a little difficult to use ... and it's not exactly easy to update the firmware (who has a floppy drive anymore?) for the motherboard. But I did get it working, in the end. I also purchased a crappy GPS unit and software from Delorme just to see if it would work, and it does, but it's horribly inprecise and the directions it gives are *TERRIBLE*. I'll be sending this unit back to Delorme ASAP.

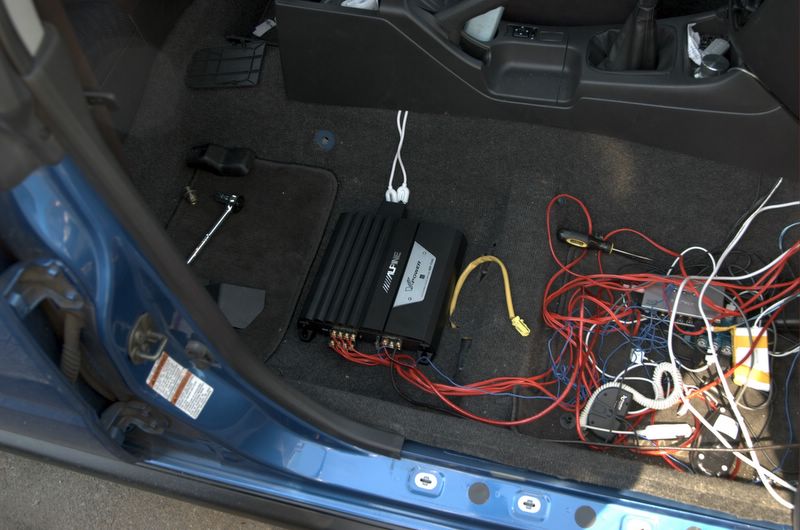
After having prototyped things by using PC speakers, a power inverter, an 250W ATX power supply the next step was to make my own VGA connector. The amount of space between the motherboard and the firewall is quite small and hence it isn't possible to fit a regular VGA connector here. L-com makes some right angle HD15 (VGA) connectors which will make up my permanent solution but in the meantime I needed something so I ripped apart an VGA gender bender and made my own connector; it's not shielded and I have at times experienced some interference. It's just a temporary solution but will do, for now. The connector from l-com is backordered and won't ship until the end of the month so ... until then it's going to have to do! They also make a right angle DB9 serial connector which will be used to hook up my OBD II unit.

So, although this setup was quite quaint, it needed some work. Time to order some more stuff ... including a 
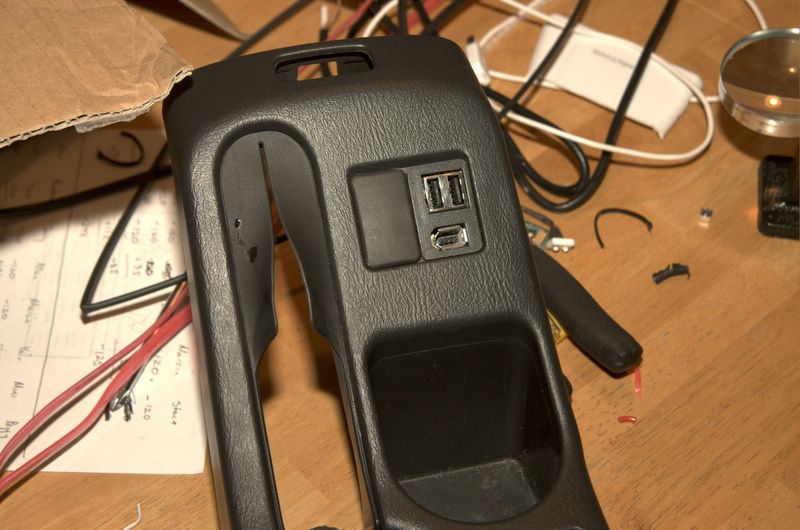
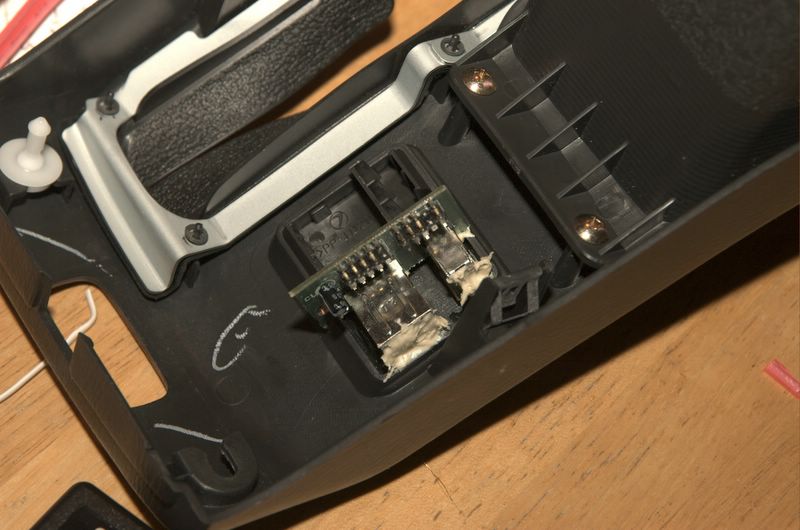
mini usb keyboard, a 120W OPUS power supply, the PowerMate control knob, and a Creative Labs Audigy 2 NX USB sound card (for cheap: 70$!) from techforless.com.

The power supply arrived on Friday, the 3rd of June (one week after the initial install was complete) and I spent the next eight hours, quality time, with my soldering iron, trying to wire everything up for use in my car. I also got myself a basket to match the audio connector for my radio from a local audio shop which I then used to attempt hooking up sound and as a spot to get a hot wire for use in starting up the computer when the key is inserted into the ingition.

In order to protect the power supply from shorting out I decided to build some kind of enclosure. I didn't have access to all the sheet metal tools I'd like so I tried to fashion something with some aviation snips and using the edge of my table as a brake but ... that didn't work terribly well so in the end I ripped apart an old CD-ROM drive and used it's enclosure as a case for the power supply. It's way to huge for this purpose will do the job, in the meanwhile.

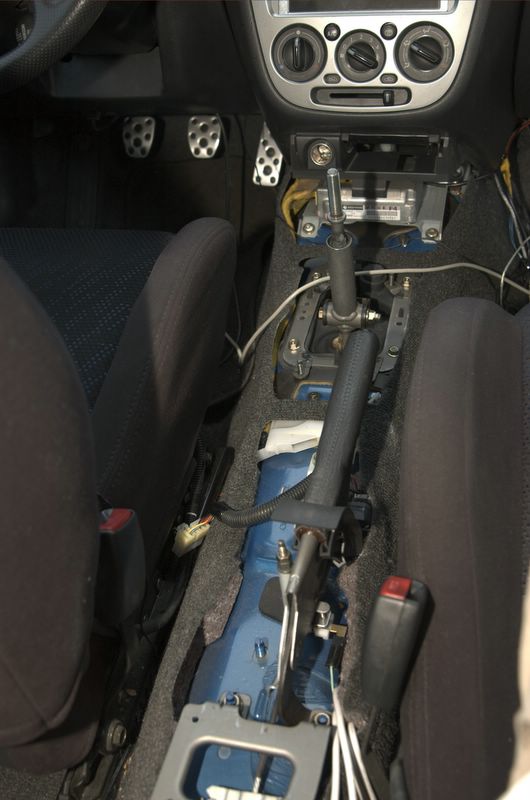
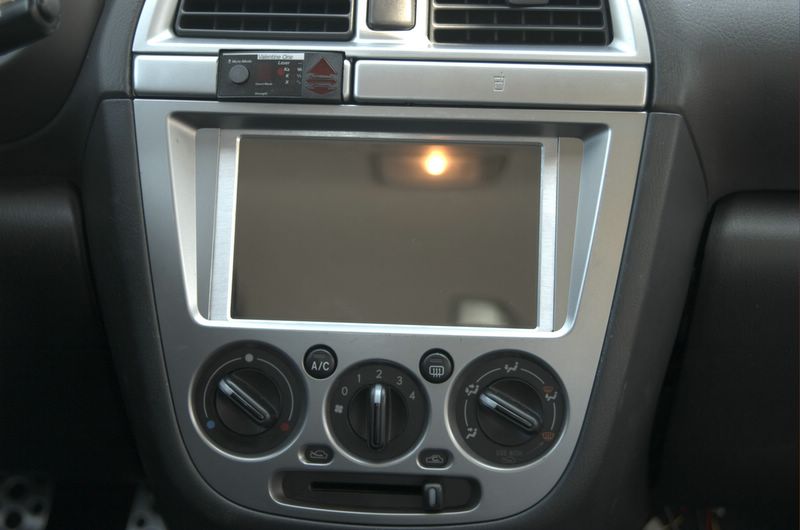
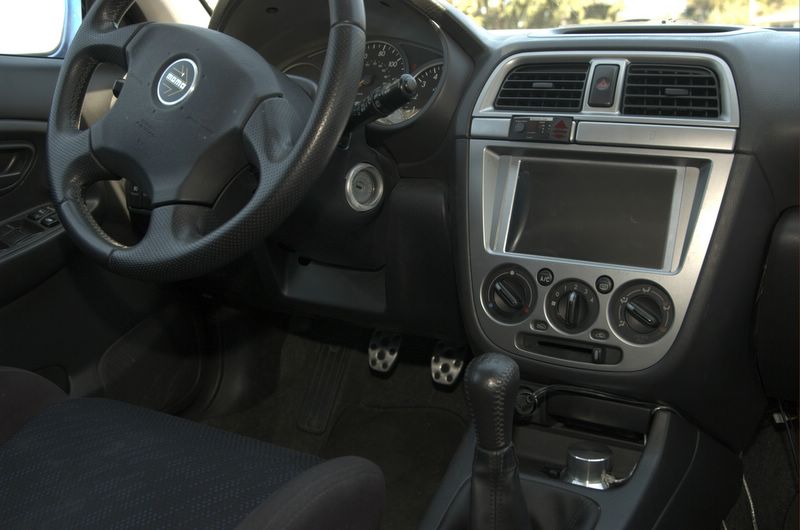
On Sunday I re-dremmelled (what a great verb!) the center panel such that the LCD would sit more flush with in the console. It worked but sadly I scratched up the panel a little bit during the process so I'm either going to try and paint it or grab yet another one from a scrap yard (or as they call them here a "pick'n'pull".)

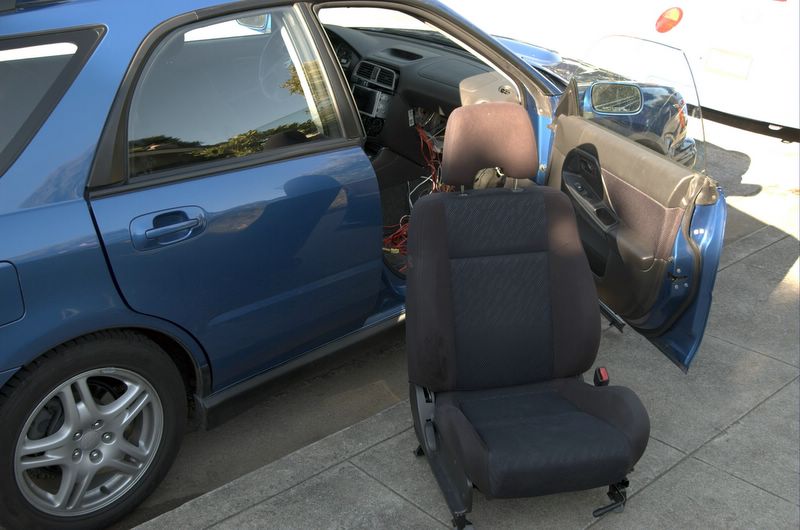
So, I removed glove box and hid the power supply and 3.5" hard drive behind it. It's a *VERY* tight fit. I will eventually be changing the hard drive and using a laptop drive that's designed to take a bit more abuse such as the Hitachi Travelmate or Endurastar models. I also hope to find a smaller enclosure for the power supply.

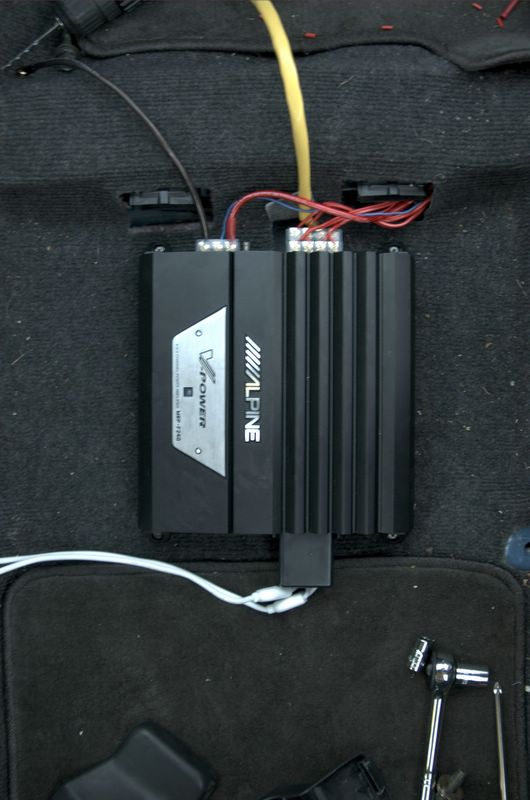
The next thing for me to fix will be sound. As expected I can't hear a thing with my current setup. I think the mini jacks output from the PC is about 0.5W ... that needs to be amplified. So I'm shopping for a 4-channel amp. that will be a good compromise between price, power, size (I want it to fit under the passenger seat and be concealed from plain view) and, of course, quality.

One of the bigger problems still unsolved has to do with brigtness of the LCD. The touchscreen film that lies on top of the LCD causes it to be horrendously reflective. I hope to do two things to remidy this problem. For one, I hope to find some kind of film or screen with which I can remove some of the glare and I also hope to eventually brighten the display using a solution such as the one outlined here. Currently the system is effectively only useful at night or in dim lighting. I knew before I started this project that this would be a problem but in truth it's even worse than I expected! It's what you might call a show-stopper IMHO!

Looming on the horizon for other developments are:


  • USB AM/FM radio from Griffin

  • Fan Monitor and control unit

  • Wireless keyboard/mouse/windows media player remote control

  • USB XM PCR Radio (out of production but still available on eBay from time to time)

  • wireless internet + war driving

  • bluetooth ... for dial-up access with my cell phone, maybe for use with replacement GPS unit ...

  • speaker upgrade

  • microphone

  • slim DVD-ROM, maybe DVD writer and card reader for use with Compact Flash card reader and digital camera

  • software!

  • front and/or back USB cameras


One big change since the initial installation has to do with the motherboard. The M1000 board has MPEG-2 hardware accelleration so it can play DVDs (self-authored stuff which I've copied onto the hard drive) smoothly but it can't handle the audio. So, I upgraded to the VIA EPIA SP 1300 which seems to do the job very well and is just plain better overall. Get this board. The folks over at BlueBone PC had one of these in stock (along with a copy of Windows XP Media Center) so I swapped out the board and there's been no looking back since. I can now zoom in and out of the maps via the Delorme GPS software acheiving acceptable frame rates and have programmed the Griffin PowerMate to work as a zoom dial when using this application. It's really quite cool.